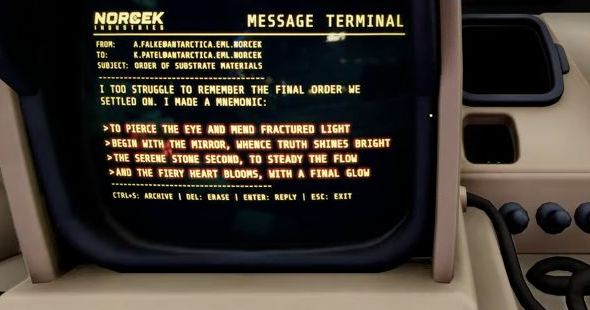
The crystal puzzle in We Were Here Tomorrow asks you to combine two kinds of information: what each mineral does and which specimen matches its drawing. A beam with the right color can still pass through the wrong crystal.
The crystal order
| Order | Mnemonic | Crystal | What to check |
|---|---|---|---|
| 1 | Reflection / the mirror | Pingosius Crystalis | The spiky specimen with the small rounded growths on top |
| 2 | The serene, stabilizing stone | Rupium | The rounded, egg-like cluster |
| 3 | The fiery heart / heat | Cattonimus | Compare the growth pattern with the drawing; do not choose by color alone |
Read the terminal’s mnemonic and compare it with THE NATURE OF THE CRYSTAL SUBSTRATES. Have the player at the drawings describe the specimen while the other checks its properties. Your room’s clues take priority over a memorized color sequence.
Keep the beam connected
- Agree on a fixed landmark: a colored doorway, a window, a receiver, or a particular stand. Call out your floor as well as the object.
- Follow the beam from its source. Leave working upstream pieces in place while you adjust the next receiver.
- Change one stand at a time. Some stands rotate; others accept an optical piece without rotating themselves.
- If moving a stand loses the incoming beam, recover that connection before adjusting its outgoing direction.
- When pieces seem scarce, inspect reachable higher areas for additional orbs before dismantling a working section.
Use the crystal order to check the path through the special specimens, then direct the final beam toward the Master Emitter. Keep both players involved: one can watch a receiver while the other adjusts a distant stand.
Wrong configuration or no beam?
| What you see | What to check next |
|---|---|
| WRONG CRYSTAL CONFIGURATION | Recheck specimen shape and order. Matching output colors are not enough. |
| A dark receiver or a beam ending early | Trace backward to the last illuminated stand. Check alignment and whether a piece was picked up. |
| A familiar crystal passed twice | Recheck the relay for a loop before changing the required order. |
The DO NOT TOUCH PINGOSIUS sign is not a reason to discard the crystal identified by the mnemonic. The final success message is “You reactivated the Laser Array! Great work!”